프로젝트에서 Ag-grid react 라이브러리를 사용하면서 이거저거 적용해보고 있다.
https://www.ag-grid.com/javascript-data-grid/row-sorting/
JavaScript Data Grid: Row Sorting
This page describes how to sort row data in the grid and how you can customise that sorting to match your requirements. Download v30 of the best JavaScript Data Grid in the world now.
www.ag-grid.com
기본 정렬
기본적인 정렬 기능을 사용하려면 sortable 을 true로 columnDef를 지정해줄 수 있다. 다만 사용해보니 rowModelType 을 clientside 로 지정해줘야 가능함을 확인했다. 만약 infinite 로 타입을 지정해주면 기본적인 정렬 기능이 통하지 않음을 확인했다. (무한 스크롤링을 구현하면 정보를 끊어서 가져오니 당연한 것 같다.)
clientside 정렬
일단, clientside 일 때 정렬을 가능하게 해줬다면, 정렬의 커스텀도 가능하다. 커스텀을 위해선 comparator 에 정렬을 위한 콜백함수를 만들어준다. 리턴 값이 0이면 매개변수로 받아준 두 개의 인자가 같은 값, 양수면 첫번째 인자가 더 큰 것, 음수면 그 반대가 된다.
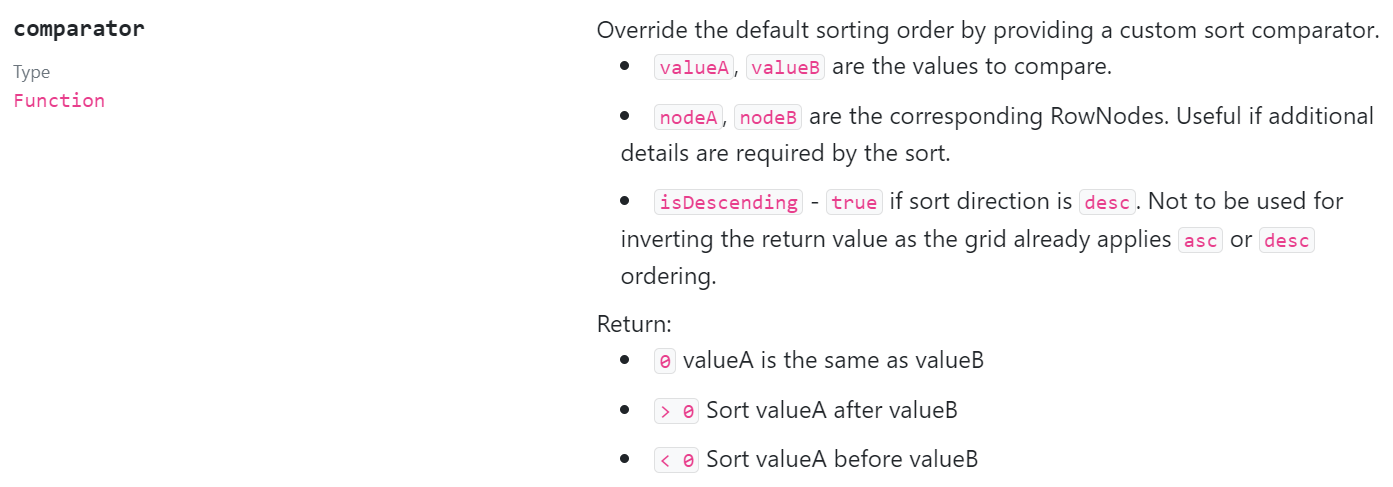
위처럼 정렬을 위한 매개변수가 주어지고, 리턴값도 정해주면 된다.
columnDefs: [
    {
        field: 'age',
        // simple number comparator
        comparator: (valueA, valueB, nodeA, nodeB, isDescending) => valueA - valueB
    },
    {
        field: 'name',
        // simple string comparator
        comparator: (valueA, valueB, nodeA, nodeB, isDescending) => {
            if (valueA == valueB) return 0;
            return (valueA > valueB) ? 1 : -1;
        }
    }
]
정렬 함수를 만들어 보자면 가장 간단한 형태는 위와 같다. 웬만한 경우에 모두 통용된다.
정렬을 확인해보는 방법은 컬럼의 헤더를 클릭하면 된다. default -> asc -> desc -> ... 순서로 적용된다.
무한 스크롤(infinite)
https://www.ag-grid.com/react-data-grid/infinite-scrolling/#simple-example-no-sorting-or-filtering
React Data Grid: Infinite Row Model
Infinite scrolling allows the grid to lazy-load rows from the server depending on what the scroll position is of the grid. Download v30 of the best React Data Grid in the world now.
www.ag-grid.com
일단, 가장 기본이 되는 무한 스크롤 방식은 data props에 데이터를 넣어주는 것이 아니라, onGridReady 라는 props에 콜백함수를 넣어줘야 한다.
즉, data에 직접 데이터를 넣어주는 방식이 clientside 이고 onGridReady 로 fetching 해온 데이터를 넣어주는 것을 infinite rowModelType 인 것이다.
const onGridReady = useCallback((params) => {
    fetch('https://www.ag-grid.com/example-assets/olympic-winners.json')
      .then((resp) => resp.json())
      .then((data) => {
        const dataSource = {
          rowCount: undefined,
          getRows: (params) => {
            console.log(
              'asking for ' + params.startRow + ' to ' + params.endRow
            );
            // At this point in your code, you would call the server.
            // To make the demo look real, wait for 500ms before returning
            setTimeout(function () {
              // take a slice of the total rows
              const rowsThisPage = data.slice(params.startRow, params.endRow);
              // if on or after the last page, work out the last row.
              let lastRow = -1;
              if (data.length <= params.endRow) {
                lastRow = data.length;
              }
              // call the success callback
              params.successCallback(rowsThisPage, lastRow);
            }, 500);
          },
        };
        params.api.setDatasource(dataSource);
      });
  }, []);
불러온 데이터를 dataSource 객체로 만들어준다. 이 객체 안에는 getRows 함수가 들어가게 되는데, 이 객체를 api.setDataSource() 메서드에 넣어서 실행시켜준다. 그러면 불러와지는 데이터가 스크롤이 내려가서 lastRow에 도달하면 api가 정해진 개수만큼씩 successCallback() 이 실행되면서 불러와진다.
기본적인 개수는 100개를 불러와지는데, 일단 가지고 있는 데이터량이 그정도가 아니고 파일 크기가 커서 나의 경우에는 cacheBlocSize props으로 한번에 불러와지는 개수에 제한을 두었다.
이처럼 대량의 데이터를 간단하게 무한 스크롤 기능을 사용할 수 있었다.
무한 스크롤 정렬
const onGridReady = useCallback((params) => {
fetch('https://www.ag-grid.com/example-assets/olympic-winners.json')
.then((resp) => resp.json())
.then((data) => {
// give each row an id
data.forEach(function (d, index) {
d.id = 'R' + (index + 1);
});
const dataSource = {
rowCount: undefined,
getRows: (params) => {
console.log(
'asking for ' + params.startRow + ' to ' + params.endRow
);
// At this point in your code, you would call the server.
// To make the demo look real, wait for 500ms before returning
setTimeout(function () {
// take a slice of the total rows
const dataAfterSortingAndFiltering = sortAndFilter(
data,
params.sortModel,
params.filterModel
);
const rowsThisPage = dataAfterSortingAndFiltering.slice(
params.startRow,
params.endRow
);
// if on or after the last page, work out the last row.
let lastRow = -1;
if (dataAfterSortingAndFiltering.length <= params.endRow) {
lastRow = dataAfterSortingAndFiltering.length;
}
// call the success callback
params.successCallback(rowsThisPage, lastRow);
}, 500);
},
};
params.api.setDatasource(dataSource);
});
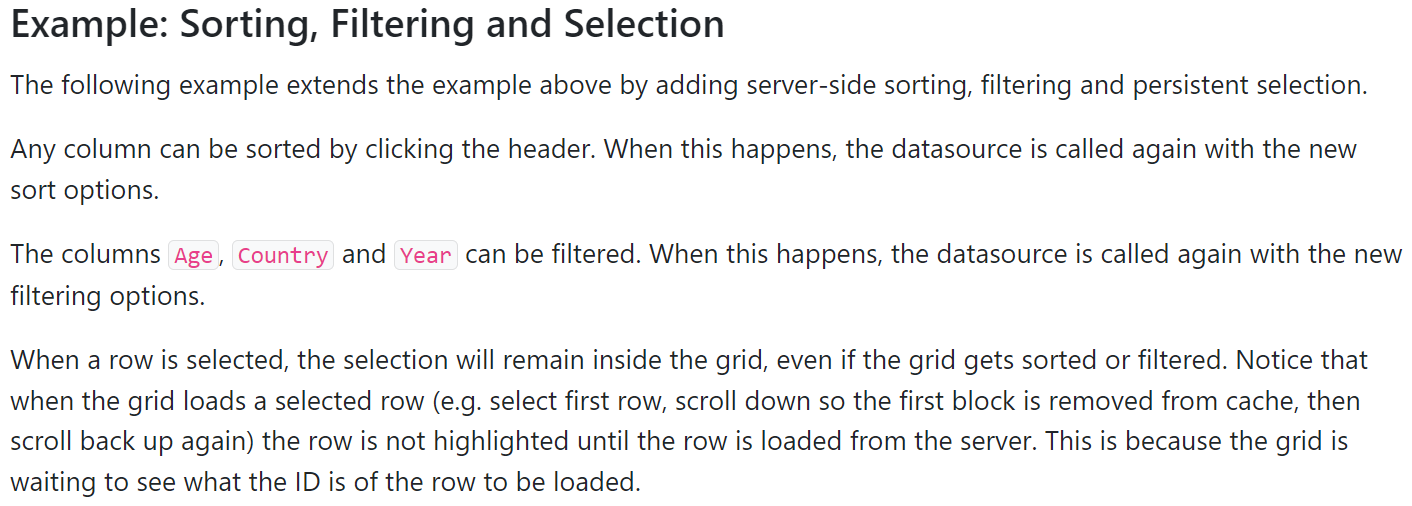
}, []);공식 문서에선 정렬과 필터를 같이 적용해주었다. 내가 진행하는 프로젝트에선 필터 기능은 따로 api를 불러와주는 방식으로 사용될 예정이라 정렬 부분만 참고하였다.
const sortAndFilter = (allOfTheData, sortModel, filterModel) => {
  return sortData(sortModel, filterData(filterModel, allOfTheData));
};

const sortData = (sortModel, data) => {
  const sortPresent = sortModel && sortModel.length > 0;
  if (!sortPresent) {
    return data;
  }
  // do an in memory sort of the data, across all the fields
  const resultOfSort = data.slice();
  resultOfSort.sort(function (a, b) {
    for (let k = 0; k < sortModel.length; k++) {
      const sortColModel = sortModel[k];
      const valueA = a[sortColModel.colId];
      const valueB = b[sortColModel.colId];
      // this filter didn't find a difference, move onto the next one
      if (valueA == valueB) {
        continue;
      }
      const sortDirection = sortColModel.sort === 'asc' ? 1 : -1;
      if (valueA > valueB) {
        return sortDirection;
      } else {
        return sortDirection * -1;
      }
    }
    // no filters found a difference
    return 0;
  });
  return resultOfSort;
};
정렬의 기본 함수 기능 자체는 기본 정렬의 경우와 크게 다를 바 없다.
'Ect. > Library' 카테고리의 다른 글
| pynetdicom 을 사용하여 DICOM Networking 시도 (1) | 2023.10.07 |
|---|---|
| react-babylonjs 라이브러리 사용해보기 (1) | 2023.10.03 |
| React Chart 라이브러리 - recharts (0) | 2023.08.31 |
| 리액트 Chart 라이브러리 (0) | 2023.08.26 |
| 리액트 테이블(표) 라이브러리 종류 (1) | 2023.08.25 |


