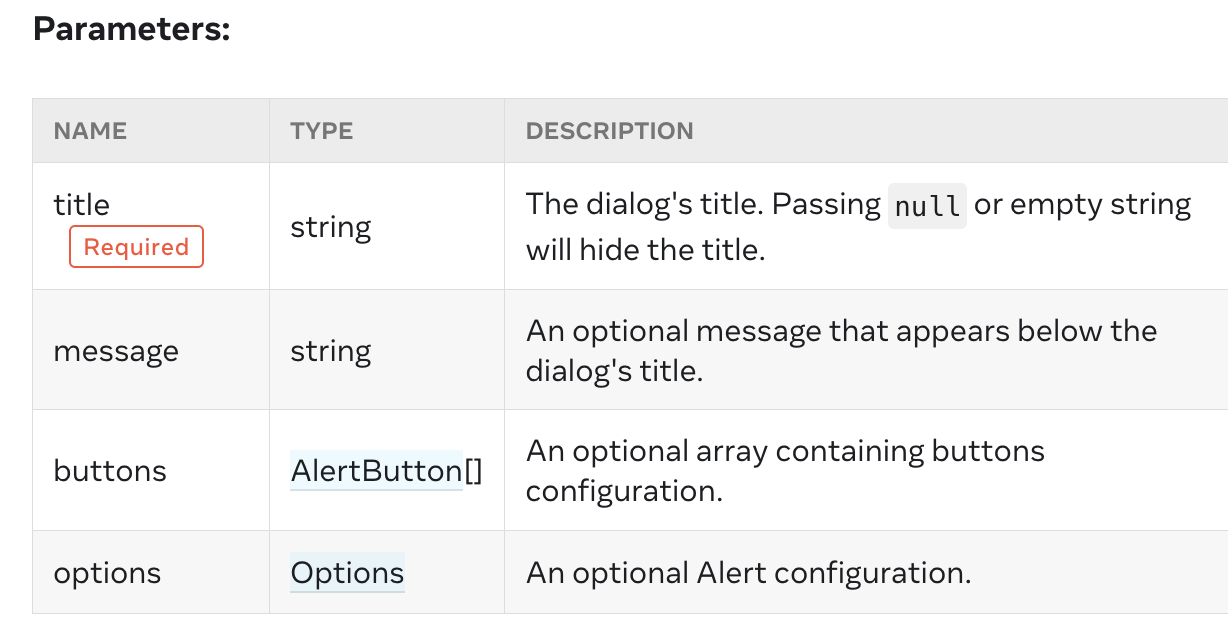
Alert API
https://reactnative.dev/docs/alert
Alert · React Native
Launches an alert dialog with the specified title and message.
reactnative.dev
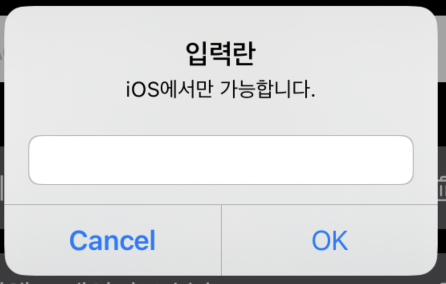
Alert.alert() 말고도 Alert.prompt() 도 존재한다. (only iOS)

Alert.prompt('Title', 'Message');
입력 받은 값을 활용해줄 수 있다.
일단 기본적인 강의는 여기까지이다.
코드 챌린지
기본적으로 수정기능과 완료기능을 넣기 위해서 삭제 버튼 옆에 버튼들을 추가해주었다.
그리고 섹션을 나눠주기 위해서 flex 사이즈로 내용 부분과 버튼 부분의 레이아웃을 만들었다.
1. 수정 기능
수정 기능을 처음에는 todo 리스트 각각의 칸에 접근하여 TextInput 으로 변경해서 바로 수정하게끔 만들었으나
위에서 배운 Alert.prompt 를 사용하면 더욱 간단하게 가능했다.
  const modifyTodoBtn = async (key) => {
    try {
      Alert.prompt('수정 안내', '수정하실 내용을 입력해주세요.', [
        {
          text : '취소',
          style: 'cancel'
        },
        {
          text: '수정',
          style:'destructive',
          onPress: async (txt) => {
            const modifyingTodo = {
              ...todos,
              [key] : {
                ...todos[key],
                text : txt,
              }
            }

            setTodos(modifyingTodo);
            await saveTodos(modifyingTodo);
          }
        }
      ]);
    } catch(err) {
      throw err;
    }
  }
내가 처음에 생각한 방법으론 함수와 useState 가 쓸데없이 더 필요해서 비추천
모바일이므로 있는 기능을 사용하자!
추가로 완료된 리스트에는 수정버튼을 없애주었다.
2. 완료 기능
done 이 됐다는 값을 저장하기 위해서 객체에 키를 추가해주었다.

  const doneTodo = async (key) => {
    const changeDone = {
      ...todos,
      [key] : {
        ...todos[key],
        done : !todos[key].done,
      },
    }

    setTodos(changeDone);
    await saveTodos(changeDone);
  }
그리고 done 버튼을 토글 버튼으로 구현하였다. 완료되고 다시 미완이 될 수 있을텐데 변경이 불가하니까 좀 이상해서..
완성!
3. Travel 이나 Work 둘 중에 사용자가 앱을 마친 그 화면으로 시작해주기
working 의 값으로 탭 목록을 보여주고 있었으므로 AsyncStorage 를 사용하여 사용자가 마지막에 누른 탭의 value 를 저장해주면 된다.
  const saveTabs = async () => {
    try {
      const result = JSON.stringify(working);
      await AsyncStorage.setItem(TAB_KEY, result);
    } catch (err) {
      throw err;
    }
  }

  const loadTabs = async () => {
    try {
      const result = await AsyncStorage.getItem(TAB_KEY);
      result !== null ? setWorking(JSON.parse(result)) : null;
    } catch (err) {

    }
  }
탭을 바꿀 때 사용되는 함수에 saveTabs 를 넣어주고,
앱을 불러올 때 loadTabs 를 해준다.
App 배포
앱을 publishing 해주기
강의 내용상 웹 UI 를 먼저 오픈해줘야 하는데 이 기능이 사라진지 좀 된 것 같다.
그래서 아래의 명령어를 터미널에 입력해주면 된다고 함
expo publish실행하면 웹UI 로 확인할 수 있는 링크가 나온다. 이것을 다른 핸드폰으로 확인해준다.
아이폰만 실행하다가 안드로이드로 처음 이때 해봤는데
수정 기능의 Alert.prompt 가 iOS 전용이라 안드로이드에선 먹히지 않았다.
수단1 -> link 부분이 잘 되지 않아서 자꾸 오류 발생함.. 그래서 보류
그래서 서칭한 뒤, https://github.com/shimohq/react-native-prompt-android
GitHub - shimohq/react-native-prompt-android: A polyfill library for Alert.prompt on Android platform, working both on Android a
A polyfill library for Alert.prompt on Android platform, working both on Android and iOS platform. - GitHub - shimohq/react-native-prompt-android: A polyfill library for Alert.prompt on Android pla...
github.com
이 라이브러리를 쓰기로 하였다. 설치하고 import 해주면 간단하게 가능하다.
기존의 Alert.prompt 와 사용법이 유사함.
수단2 -> 왜인지 이것도 자꾸 먹히지 않았음
https://www.npmjs.com/package/react-native-dialog-input
react-native-dialog-input
Dialog with input for React Native on iOS and Android.. Latest version: 1.0.8, last published: 3 years ago. Start using react-native-dialog-input in your project by running `npm i react-native-dialog-input`. There are 2 other projects in the npm registry u
www.npmjs.com
일단 안드로이드는 보류하기로 했다. 아이폰은 잘됨 ㅠ
그리고 실행해보니 버튼들이 너무 작아서 클릭하기 어려움을 느꼈다. flex 사이즈와 간격을 좀 띄워주었다.

기본적으로 앱이므로 iOS와 안드로이드만 배포를 생각하지만, expo 는 웹 브라우저에서도 배포가 가능하다.
먼저 설치 해줘야하는게 있음
npx expo install react-native-web@~0.18.10 react-dom@18.2.0 @expo/webpack-config@^18.0.1다만 웹에선 원래의 리액트 네이티브 컴포넌트들이 브라우저에 맞는 태그들로 변하므로,
View -> div
Text -> span ...
이처럼 변경되면 당연히 발생하는 오류들이 있다. (Alert 는 Web에서 실행되지 않는다는 등..)
AsyncStorage 는 Web에선 LocalStorage 로 사용된다고 한다.

웹 화면에서 버튼들이 다 반응하지 않는 것을 알 수 있다.
이를 해결하기 위해선 Platform API 를 사용해준다!
https://reactnative.dev/docs/platform
Platform · React Native
Example
reactnative.dev
import {Platform,} from 'react-native';삭제 기능을 예시로 Platform.OS가 web 이면 브라우저의 confirm() 을 사용하는 로직을 짜준다.
  const removeTodos = async (key) => {
    if(Platform.OS ==='web') {
      // Web
      const ok = confirm(`정말로 '${todos[key].text}' 내용을 삭제하시겠습니까?`);

      if(ok) {
        Reflect.deleteProperty(todos, key);
        await saveTodos(todos);
        loadTodos();
      }
    } else {
      // App
      try {
        Alert.alert('✔️ 안내', `정말로 '${todos[key].text}' 내용을 삭제하시겠습니까?`, [
          {
            text: '취소',
            style: 'cancel',
          },
          {
            text: '삭제',
            onPress: async () => {
              Reflect.deleteProperty(todos, key);
              await saveTodos(todos);
              loadTodos();
            },
            style: 'destructive'
          }
        ]);
      } catch(err) {
        throw err;
      }
    }
  }
app.json 파일
{
  "expo": {
    "name": "NomadWeather",
    "slug": "NomadWeather",
    "version": "1.0.0",
    "orientation": "portrait",
    "icon": "./assets/icon.png",
    "userInterfaceStyle": "light",
    "splash": {
      "image": "./assets/splash.png",
      "resizeMode": "contain",
      "backgroundColor": "#ffffff"
    },
    "assetBundlePatterns": [
      "**/*"
    ],
    "ios": {
      "supportsTablet": true
    },
    "android": {
      "adaptiveIcon": {
        "foregroundImage": "./assets/adaptive-icon.png",
        "backgroundColor": "#ffffff"
      }
    },
    "web": {
      "favicon": "./assets/favicon.png"
    }
  }
}
expo 안의 ios > supportsTablet : 태블릿 가능 여부
web > favicon 모양 지정
splash 는 앱이 재구동될 때 나오는 화면 등등
앱을 원하는대로 만들기 위해 설정해줄 수 있다.
https://docs.expo.dev/versions/latest/config/app/
app.json / app.config.js
Expo is an open-source platform for making universal native apps for Android, iOS, and the web with JavaScript and React.
docs.expo.dev
자세한 설정은 여기서 확인 가능
splash Screen

- adaptive-icon : 안드로이드에서 보이는 아이콘
- favicon : 웹에서 보이는 즐겨찾기 아이콘
- icon : 아래와 같은 아이콘 모양

- splash : 앱을 새로고침(재구동)할 때 뜨는 화면

적당히 바꿔주었다.
Build
앱스토어에 앱을 제출 전 빌드하는 과정
Expo Cli 로 가능한데, 윈도우->iOS, Mac->Android 빌드 과정을 Expo 서버에서 진행되므로 가능하다.
강의에 나온 expo build:android 대신
npm install -g eas-cli

eas build -p android
를 사용해준다고 한다.
iOS의 경우도 이름만 다르게 해줄 뿐 마찬가지이다. (Apple id 와 password 가 필요)
대신 앱을 만들어주는 개념이라 시간이 좀 오래걸린다.
React Native Mac/Window?
마이크로소프트에서 만든 프레임웤
https://microsoft.github.io/react-native-windows/
React Native for Windows + macOS · Build native Windows & macOS apps with Javascript and React
Build native Windows & macOS apps with Javascript and React
microsoft.github.io
리액트 네이티브와 동일한 컴포넌트와 api 를 사용해준다.
Viro React
VR 이 가능한 리액트 네이티브
https://github.com/viromedia/viro
GitHub - viromedia/viro: ViroReact: AR and VR using React Native
ViroReact: AR and VR using React Native. Contribute to viromedia/viro development by creating an account on GitHub.
github.com
길어져서 여기까지!!
'App Study > React Native' 카테고리의 다른 글
| 노마드코더 리액트 네이티브 - 5 (0) | 2023.05.30 |
|---|---|
| 노마드코더 리액트 네이티브 입문 - 4 (0) | 2023.05.29 |
| 노마드코더 리액트 네이티브 입문 - 3 (0) | 2023.05.27 |
| 노마드코더의 리액트 네이티브 입문 - 2 (0) | 2023.05.25 |
| 노마드코더의 리액트 네이티브 입문 - 1 (0) | 2023.05.24 |


